

At the preparation stage, decide what you want to make, from what materials, and how much you will spend on these materials to start renovating a bathroom.
Redevelopment
- decide whether you will build new niches and partitions
- If you are expanding the bathroom, decide which way to go: combine it with a toilet or increase its area using a corridor
- if you are replacing a door, select it and invite a measurer to measure the doorway and tell you whether it needs to be widened or narrowed
Could you select a material and count its quantity?
- Select pipe material. Make a diagram of how they will be laid in the bathroom and calculate how many of them you need.
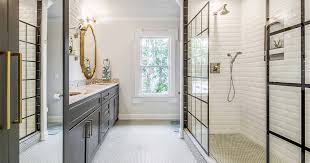
- Choose the type of wall and floor finishing to suit your taste.
- Calculate the surface area. This way, you will understand how many packages of tiles or plastic panels, drywall, and cans of decorative plaster and finishing paint will be needed. Take the tiles with a margin of 10–15% for trimming. GCR is sold in slabs – calculate the area of ?? future structures and add 20% of the material for trim. The consumption of plaster and paint per square meter is indicated on the packaging.
- Select the type of finish for the ceiling. Here, you can rely on your capabilities: if you want to do everything yourself, then you can paint, apply decorative plaster, or make a suspended ceiling on a frame with moisture-resistant plasterboard, but for a stretch ceiling, it is better to invite specialists.
- Don’t forget about the “little things”: polymer primer, grout for tile joints, crosses and glue for tiles, plaster for leveling walls in wet rooms, polyurethane sealant, profiles for boxes, etc. If you work with a designer and finishers, they will tell you how much to buy materials. And if you do everything yourself, the Petrovich repair calculator will help: it calculates the amount of materials automatically and considers all the valuable details.
Create a bathroom renovation project and estimate
If you are doing a redevelopment balcony repair in melbourne, draw up a project so that before construction, it is agreed upon by the Bureau of Technical Inventory, which keeps records of the condition of all buildings in the city.
If you don’t want to draw up drawings, plans, and explanatory notes yourself, this can be done by engineers and designers from architectural bureaus.
Dismantling
Dismantle everything that you will change, and that will interfere with the repair:
- Remove the plumbing.
- Remove the tile. Clean off any tile adhesive that remains on the wall.
- Dismantle boxes made of plasterboard and profiles.
- Remove the pipes. If some were recessed into the wall, open these channels and remove the old pipes.
- Look at the plaster. If there are holes and bulges on the border with differences between them of 2 cm or more, or if the plaster is moldy, it must be completely removed from the walls.
Rough finish
- Align the walls so that they meet strictly at right angles. Otherwise, it will not be possible to lay tiles, finishing panels, or gypsum plaster boards evenly. Increase the required volume on the walls with plaster. Plaster the ceiling must also be brought together with the walls at a right angle.
- After you level the walls, make grooves for the pipes. This is necessary so that the water sockets – the fittings to which the faucets are connected – and the pipes remaining outside are level. If the tap for the mixer is mounted on an uneven wall, then the mixer itself will be crooked.
- Determine where the collector unit, filters, water meters, and leak protection will be located. This needs to be done at the beginning of work because you will begin installing the pipes in the bathroom from this place. Consider where and how you will place this unit so valves and meters can be easily reached through the inspection hatch.
- Install the pipes.
- Finish the channels for electrical wiring cables and make recesses for socket boxes.
- Make waterproofing: cover the floor and 15–20 cm of the walls below with polymer coating materials that do not allow water to pass through. This way, you will protect your neighbors from leaks (prescribed in SNiP 2.03.13-88 ).
- If you still need to wall up some of the pipes in the wall, assemble boxes made of moisture-resistant plasterboard for them on a frame made of profiles. Apply waterproofing over the boxes and carefully coat all corners and joints.
- Assemble the heated floor.
Finishing
- If you finish the bathroom with tiles, make a preliminary layout. Lay the tiles on the floor in the next room the way they will be in the bathroom. The form will tell you how many tiles will fit vertically and horizontally.
- If you finish the bathroom with plastic or wooden panels or decorative plaster, make a lathing – a frame for the meetings.
- Place finishing materials on the walls.
- Putty and prime the ceiling. Soil with antifungal additives will additionally protect concrete from mold.
- Before priming, smooth the putty on the ceiling with an abrasive, wash off the dust, and clean the tiles from traces of glue.
- If making a suspended ceiling, assemble a frame with plasterboard boards.
- Apply grout to the tile joints and wash it down.
- Seal the joints between the panels with silicone sealant.
This post was created with our nice and easy submission form. Create your post!


Comments
0 comments